Monday, December 20, 2010

Glazed Carrots

Just in time for the holidays, we have glazed carrots! I don't know why, but this dish always seemed a little festive to me. It's sweet and has cinnamon, so maybe that's why it reminds me of Fall and Winter. Whatever the reason, it's simple and quick to make and sure to delight your guests! (It's good for when you're just cooking for yourself, too! :-)


Ingredients:

4 or 5 carrots
1/4 cup water
1/4 tsp salt
2 tbsp brown sugar
2 tbsp butter
1/4 tsp cinnamon

Cut the carrots into thick slices. I like to cut them on the bias to make long slices for a nicer presentation, but however you cut them, it'll end up tasting the same. I don't bother to peel them, but if there are any blemishes, you should trim them off.

Put the carrots into a large skillet over high heat, and add the water and salt. Move the carrots around occasionally to make sure they cook evenly. Once the water is gone, add the brown sugar, butter and cinnamon. Keep stirring until the sugar has dissolved into the butter.

Keep cooking the carrots until the sauce has become glossy and is coating the carrots well. If the sauce looks too thin and runny, that means there is too much water and/or juices from the carrots and the glaze won't stick, so you'll need to keep the carrots on the heat to cook off some of it. Make sure to keep stirring to prevent burning. If they brown a little bit, that's okay. Your pan will need to be very hot throughout this entire process for this to work.

Depending on your cookware and your stove, you may need to get the empty skillet very hot, hot enough to sizzle when you sprinkle a few drops of water on it, before you start the entire cooking process. If your pan is too cool, the carrots may be very over-cooked by the time the glaze thickens, but if you like your carrots that way, then you may want to start with a cool pan intentionally.

I like cinnamon in this, but any sweet spice or combination of spices will work, such as nutmeg, cloves, allspice, etc. Just make sure not to overdo it, moderation is key.

Bon Apetit!

Friday, December 17, 2010

Braised Cabbage with Cream Sauce


I stole this recipe from Katie, who I think got it from Lucas. Anyway, this is probably the most elegant presentation for cabbage that I've ever seen, and pretty tasty to boot.

Ingredients:

1 or 2 small heads of cabbage
1 1/2 cups cream
1/4 tsp salt
1/4 tsp nutmeg
water
butter

In a small saucepan over low heat, combine the cream, salt and nutmeg. Let the sauce reduce by half, stirring every 5 minutes or so to prevent burning. This will take 20-30 minutes.

While the sauce is reducing, prepare the cabbage. Peel off any damaged outside leaves. Leaving the core in to hold the leaves together, cut the cabbage in half lengthwise. Cut the cabbage into wedges, making sure that each section has a bit of the core to hold it together. The cabbages I had were very small, so I cut it into eighths, but you may need to cut more wedges if your cabbage is larger.

In a large skillet over high heat, arrange the wedges in a single layer and add a half inch of water. Do not over crowd the pan; you may need to do this in batches. When half of the water is gone, flip the wedges over to cook the other side. When the water is mostly gone, add a small pat of butter to help brown the cabbage. You won't need very much. Move the wedges around to coat the bottoms with butter, then flip them over. When the cabbage has browned slightly, flip them over to brown the other side. Remove the cabbage wedges to a plate immediately after they are done and cook any remaining cabbage wedges.

To serve, arrange the cabbage wedges and then drizzle a tablespoon of the cream sauce over each one.

Bon Apetit!

Thursday, December 16, 2010

Roasted Root Vegetable Salad

Okay, now we're getting down to business! I had to make a dish to bring to a pot luck, so I knew I had an opportunity to use up lots and lots of veggies!

Here we have (starting at the top and going clockwise) lettuce, leeks, strawberry daikon radish, sweet potato, garlic, onion, carrots and lemons. In the center, the large lumpy thing is a celery root, and next to it are some potatoes. The onions and carrots were not from the veggie box, but we have gotten them in the veggie boxes before. The garlic is from the store and the lemons are from my parents' backyard, admittedly not local as they live over 350 miles away, but I was coming from there anyway ;-)

This of course can be scaled smaller to feed less people, and you certainly don't need this kind of variety. But I must say, the end result with all of these veggies was absolutely delicious!

Here's what you'll need to feed about 10 people:

Salad

5 lbs root vegetables
2 tsps salt
1 tbsp black pepper
1/4 cup olive oil
2 medium sized heads of lettuce (not iceberg!)

Dressing

1/4 cup lemon juice
3/4 cup olive oil
1/4 tsp black pepper
1/2 tsp salt
1 tsp prepared mustard
1/2 bulb roasted garlic

Leeks are notoriously dirty vegetables. To clean them, you need to cut them in half lengthwise, leaving the root on to keep the leaves together. Depending on what your leeks look like, you may have to cut up to half of the top off, most of the dark green part. Carefully rinse them under running water.

Make sure to clean between all of the leaves. There usually won't be much dirt closer to the root or the inner layers, but it's better to be safe than sorry. There's nothing like grit to ruin your eating experience. Put the cleaned leeks on a large cookie sheet or broiling pan.

Cut up the remaining root vegetables. I halved the carrots and quartered most of the others. The celery root was pretty big, so I cut it into eighths. I left the skin on most of the vegetables, less waste that way, but sweet potato skins can be weird sometimes, so I peeled it. Not having a lot of experience with celery root, I peeled it pretty aggressively 'cuz it looked like it might be a bit woody. Leave the root end on the onion to keep it together.

Clockwise from the top left: celery root, sweet potato, strawberry daikon radish, carrots, potato and onion.

Cut the top off of the half-bulb of garlic.


Pool a bit of olive oil on the bottom of the pan and put the garlic bulb cut-side down on it.


Toss the vegetables with the olive oil, salt and pepper. It's a bit messy, but it's best to do this with your hands. Make sure to rub down the leeks with oil as well.


Cover the pan with aluminum foil and place in the oven at 350 degrees for 30 minutes.


Remove the aluminum foil and the garlic and continue roasting at 350 degrees for an additional 30 minutes.

While the vegetables are roasting, tear the lettuce into bite size pieces and put them in the bottom of a large serving dish.

Using a butter knife or a small steak knife, pop out the roasted garlic cloves.


Smash the garlic cloves well with a fork or with a mortar and pestle. Whisk together all of the ingredients for the dressing. The prepared mustard helps to keep the lemon juice and olive oil from separating.

Once the vegetables are cool enough to touch, cut them into bite size pieces.

Cut the carrots on the bias to make long slices.


Slice the radishes and the celery root. (celery root not pictured)


Cut the potatoes and the sweet potato into chunks.


Holding the root end of the onion pieces, cut up the onion. Be very careful as the onions will be extremely slippery! If you want, you can simply cut off the root end, and leave the onion layers whole.


Cut up the leeks in a similar manner.


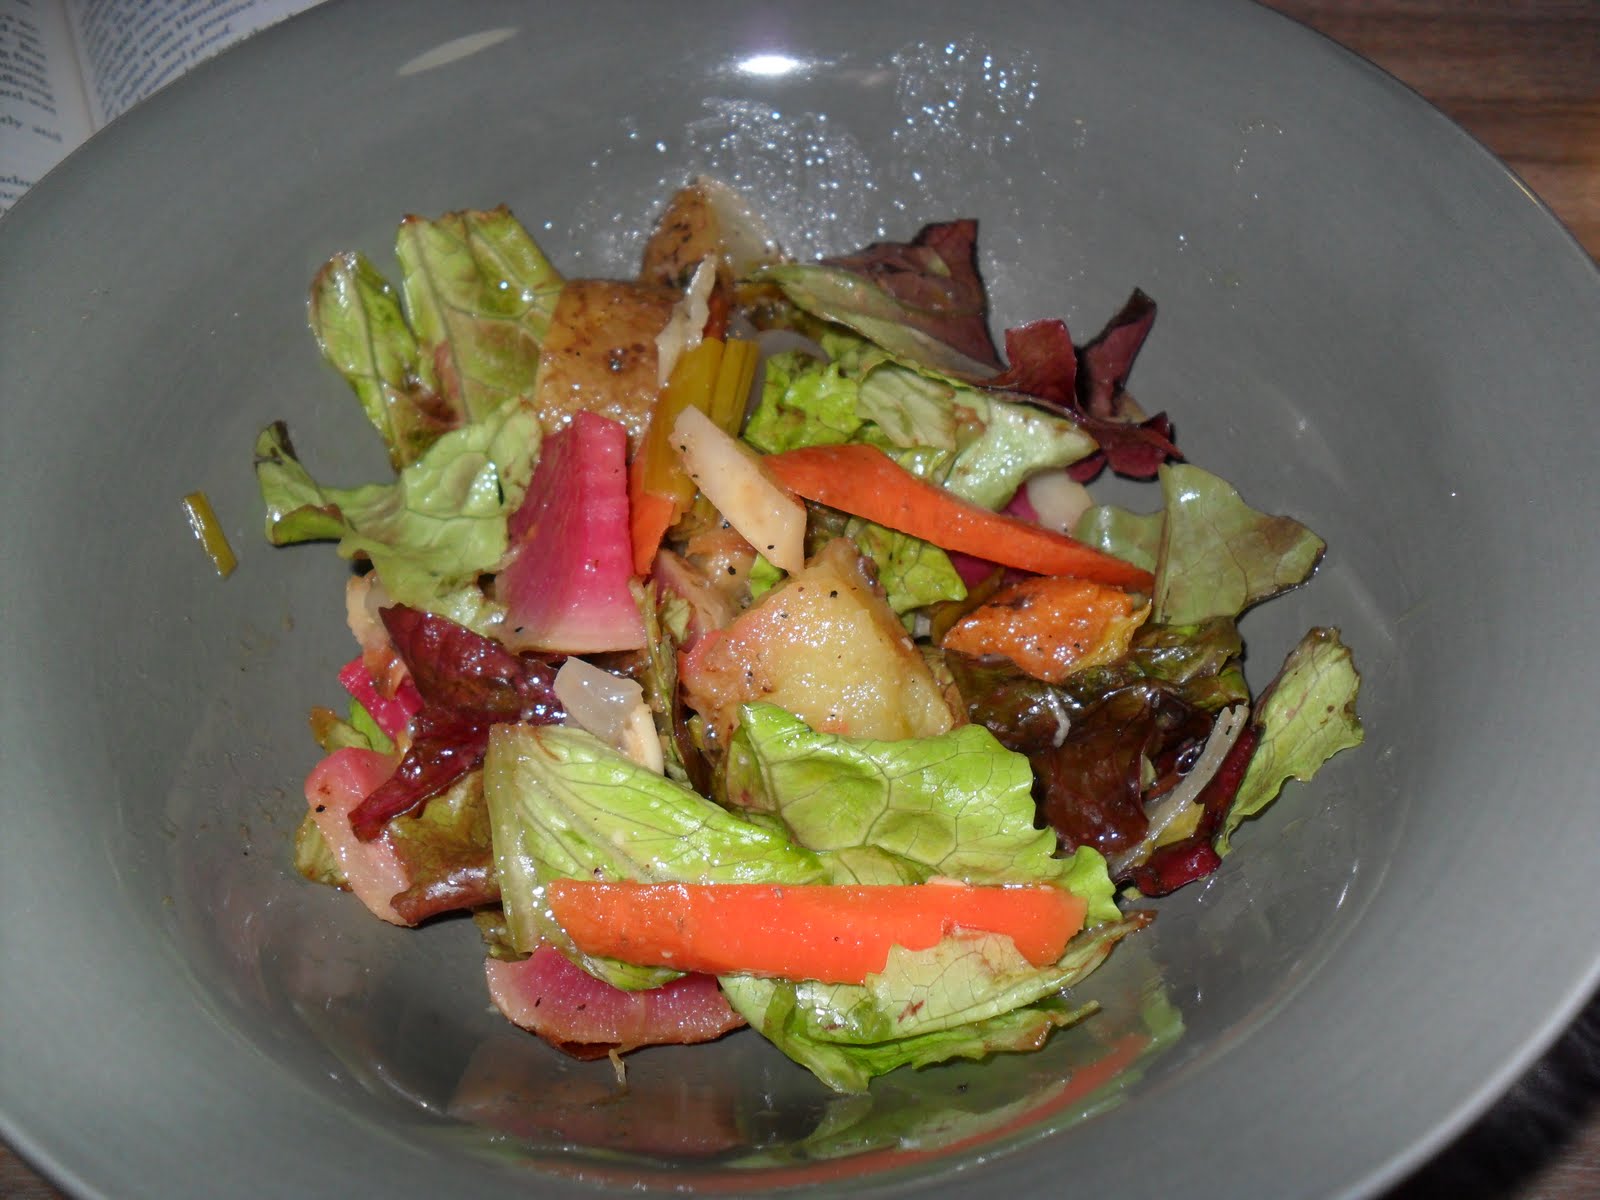
Arrange the roasted vegetables on top of the lettuce.


You can mix them all together like I did in the picture, or you can keep them separated to form larger sections of color. Arranging the vegetables that way can be quite pretty, as well as help people chose which vegetables they want if you anticipate picky eaters. I had to arrange the salad in this container because I was transporting it to the pot luck. If it was going to serve this at home, I would have chosen something more presentable, but it still came out looking pretty good!


Bon Apetit!

Sunday, December 12, 2010

Stuffed Sweet Dumpling Squash

I love how the variety in the veggie boxes forces me to experiment with new foods and recipes. Although I should be studying Greek today for the final tomorrow, I've been itching to do something with the sweet dumpling squashes we've been getting. (I was now up to three, plus a mini-pumpkin I had bought for halloween.) Besides, I was kind of getting overrun with squash, so it was time to do something about it.

At first I was going to do a savory dish, but since the last veggie box also came with apples and sweet potatoes, I decided to try to use up as much "veggie box stuff" as possible in one go.


Here's what you'll need:

4 sweet dumpling squash and/or mini-pumpkins

Filling:
1 small apple
1 small sweet potato
1 egg
1/4 cup heavy cream
2 tbsp brown sugar*
1/4 tsp each salt, nutmeg and cinnamon

Crumble topping:
1 tbsp each butter, flour, rolled oats and brown sugar

*This is entirely dependent on the size of your squash, apple & sweet potato. Mine were very small and you will likely need to add more brown sugar if you purchase your produce from the grocery store.


Using a paring knife, cut around the stem of each squash. You want a decent sized hole; I had to go back and widen the first one.

(took this picture with my chin!)


With a sturdy teaspoon, scoop out the seeds. Don't be overly aggressive while doing this; I actually pierced the bottom of one of the squashes with the teaspoon. Oops!

Place the squash shells in an baking dish.


Peel the apple and the sweet potato. This sweet potato I got was perfect cuz it was so small.

The apple and sweet potato naked.

Remove the core from the apple, then finely dice it and the sweet potato. (I ended up with about a half cup of each.)

The apple and sweet potato have been punished for their indecent exposure.

In a small bowl, beat the egg, then add the cream, apple, sweet potato, salt, cinnamon and brown sugar, then combine.


Evenly distribute the filling among the squash and carefully add about a half inch of water to the baking dish. Don't get any water inside of the squash.


In a small bowl, combine the ingredients for the crumble topping: butter, brown sugar, flour, rolled oats. Rub the mixture together with your fingers until the butter has been fully incorporated. Evenly distribute the crumble mixture on top of the filling.


Bake for 1 1/2 hours at 350 degrees.


Aren't they cute!!! The skins of the sweet dumpling squash are very tender; you can eat the whole thing except for the little woody bit at the bottom. The pumpkin skins are a little tough, so you're better off going at it with a spoon and scooping the good stuff out.

Bon Apetit!

Tuesday, December 7, 2010

Winter Salad and roasted veggies


WINTER SALAD
(Made in cooperation with Abby!)
we made enough for 10 people, so I'll try to estimate lower proportions:
CARROTS 4 or 5 big ones
BEETS - one red, one gold
grate all of the above. Notice their lovely colors at this point, because once they get mixed, everything turns beetcolor.
PARSLEY - about 1/4 cup, (must be fresh, this is the salady part of the salad) broken or chopped into small pieces
GOAT CHEESE - an ounce or so, crumbled
dressing: equal parts oil and vinegar, salt and pepper to taste


Random soup:
2 onions (saute in butter until translucent)
1 cabbage
Veggie broth - enough to cover this and more. For broth we've been buying "better than bullion" and mixing it with water - tastes great! Cook all of this until the cabbage is soft
Broccoli (4 heads, chopped) - add a few minutes before serving, and only cook enough to make it tender.
Cream - mix in right before serving. Be careful not to overcook it or it will curdle. I used about 1/2 cup for a major pot of soup.

RUTABAGAS! i found them in the T-house fridge labeled "hairy roots." They are so much better than that. Do not fear. Scrape off the hairy parts with a veggie peeler, cut into little wedges, and cook 45 min - 1 hour in a little butter in a 350 oven. Then dress with:
1 TBSP butter
1/2 tsp curry powder
2 TBSP lemon juice (our lemon tree is nearly ripe, hurray!)

Enjoy y'all

Monday, November 15, 2010

Cooked Radish?

Turnips again! YAY! I'm totally not being sarcastic because these vegetables are absolutely delicious and I actually missed them in the last veggie box.

I got a very simple recipe for them, courtesy of our ethics professor, Carol Robb. Basically, you boil them a little bit and then saute them in butter. Heaven!!!!!!

This box also came with some white radishes, and I had some strawberry daikon radishes from the previous box, which got me thinking. Why had I never encountered cooked radishes before? I quick search online helped me to see that radishes are not a one trick salad and pickle pony. (I guess that would be two tricks though, huh?)

Since I was going to cook the turnips anyway, I decided to just prepare the radishes the same way. Once cooked, radishes loose almost all of their pepperiness and gain a subtle sweetness and nuttiness, not unlike the cooked turnips.

So, here it is, as simple as can be, turnips and/or radishes sauteed in butter:


Clean the radishes and/or turnips well; cut off the tops and any stringy roots. They should not be peeled. I like leaving some of the bases of the leaves on, as they make the finished product look very rustic and homey, not to mention the nice contrast in texture that they give while eating them. Just be careful because there can be a lot of dirt trapped in there, so clean well!

Cut the vegetables into wedges. Cutting them into eighths seems to work well.

In your largest saute pan, over high heat, add enough of the vegetables to cover the bottom of the pan, and add enough water to come up about a fourth of the way up the vegetables. Sprinkle lightly with sea salt. When the water is about half gone, flip each piece to cook the other side.

When the water is gone, add a pat of butter. The amount will depend on how large your pan is and how much butter you want in this. You won't need very much. Toss the vegetables around in the pan until the butter is completely melted, then spread the vegetables around the bottom of the pan again. Once they have browned a little, flip them and brown the other side.

Depending on how many turnips and/or radishes you intend to cook, you may have to do this in batches, but the entire process is only about 5 minutes, so it goes pretty quickly.

Bon Appetit!

Thursday, October 28, 2010

Macaroni and Cheese with Mushrooms, Brie and Baby Greens

I had a bit of a mishap with the last box of veggies, They came with a nice bag of baby greens and another bag of arugula. Not really thinking about it, I tossed them into the refrigerator to use later. When I went to grab some of the baby greens for a salad a few days later, they were frozen! I had put them too close to the vent in the refrigerator. I checked the arugula, and it was in the same state. Frustrated, I tossed both back into the fridge, thinking I might find a use for them later.

I decided to make macaroni and cheese today, a kind of spiffed up version with brie and mushrooms. About halfway through the process, I remembered the frozen greens. I thought that maybe, if I chopped them up and wilted them into the macaroni and cheese, they might make a colorful and tasty addition to the otherwise vegetable free dish. So, in they went and viola! A new dish was born, and no innocent greens were wasted! I really like this version, and I might be hard pressed to not put greens in my next batch of mac 'n cheese. XD


Mac 'n Cheese with Mushrooms, Brie and Baby Greens

1 lbs macaroni

1/4 lbs cheddar

1/4 lbs brie

½ cup butter

1/2 lbs mushrooms

1 onion

2 cloves garlic

1½ tsp salt

1 tsp nutmeg

1 tbsp flour

1 cup milk

2 cups chopped baby greens and/or arugula

Prepare macaroni or other similar sized pasta according to package directions. While the pasta water is coming to a boiling, cut the mushrooms into thick slices and saute in 1 tablespoon of the butter in a medium sauce pan over high heat. Stir occasionally and cook until the mushrooms are golden brown.

While the mushrooms are cooking, finely dice the onion and mince the garlic. Shred the cheddar and cut the brie into small chunks. Set the mushrooms aside in a small bowl.

In the same saucepan, melt the remaining butter over high heat, then add the garlic. Once the garlic is just beginning to brown, add the onions, salt and nutmeg. Stir occasionally and when the onions become translucent, turn off the heat. Whisk the flour into the milk, and slowly pour over the onions, stirring constantly. When the onions have been fully incorporated into the milk, turn the heat back on to medium and cook until the mixture thickens, about 3 to 5 minutes, then turn off the heat. Add the onion mixture, cheese and greens to the cooked past and stir until the cheese is melted. Serves 5-7.

* To make the basic version of macaroni and cheese, you can omit the mushrooms, brie and greens. Increase the cheddar to 1/2 pound.


Wednesday, October 20, 2010

Turnip Greens


I first made these as part of a traditional Sunday dinner, along which hush puppies and fried chicken––quite the yummy combination! I prefer collard greens myself, but was pleasantly surprised at how good turnip greens are too, and they take much less time! Collards have to cook the better part of the day and these only take about fifteen minutes.
-Luke


Peanut oil
1/2 to 1 onion
1 (or a few) clove of garlic
turnip greens, a few bunches
Seasoning to taste: pepper, salt, red pepper, red pepper flakes etc.
1 tsp or so of bullion (or I used Better Than Bullion)

Heat some peanut oil in a sauce pan, add chopped onion and garlic, sauté, then add greens, and sauté for several more minutes. Add some salt, pepper, red pepper, red pepper flakes, and other flavors to season. Add 3/4 or 1 cup or so of water and the bullion, and continue cooking on medium to medium low for another ten minutes or so. You could use some veggie or meat broth instead of water or bullion.

"If more of us valued food and cheer and song above hoarded gold, it would be a merrier world" J. R. R. Tolkien

Sunday, October 17, 2010

KALE SOUP

no pictures because it got eaten too fast! Onion-free in Heather's honor!

Dried CHICKPEAS (1.5 cups) - boil, soak, cook for 2 hours or so - OR use a can of pre-cooked chickpeas
veggie BROTH - 4 cups? It was guesswork. Enough to cover...
1 large bunch KALE - chopped finely. Add to chickpea/broth and boil 15 minutes or so
5 finely chopped red PEPPERS (the tiny sweet peppers we got in the boxes last week. If you get a grocery-store-sized pepper, one or two will do).
and a chopped TOMATO
Cook about five or ten more minutes, seasoning well with
BLACK PEPPER
RED PEPPER FLAKES
ROSEMARY
TARRAGON
FRESH BASIL (chopped. maybe 8 leaves)
OR any kind of all-purpose "italian seasoning" you've got. The chickpeas could also be replaced with white beans or even lima. The only crucial ingredient is kale.
Serves a housefull.

hurray for kale!
Now we ate this alongside some homemade garlic-squash ravioli, but THAT is a much more complicated process (but a pleasant afternoon's activity!)... I really should've taken pictures of our masterpieces though.

Pickled Turnips

As promised, pickled turnips!


(Although I originally thought they were radishes O_o) No matter, into the pickling liquid they went!

You can adjust this depending on how sweet/sour/strong you want it to taste, but here is basically what you do:


Ingredients

3 medium turnips
1 clove garlic
1/2 cup water
1/2 cup vinegar
1 tsp salt
2 tbsp sugar

Thinly slice the turnips and the garlic and put them into a small bowl with the rest of the ingredients. Stir gently until the salt and sugar dissolve. Enjoy!

Those of you who were paying attention, I'm sure you noticed the turnips in the picture were diced and not sliced. I cut the turnips into cubes this last time because I thought it might be an interesting texture, but I liked it much better the last time when I sliced them. You can of course "pickle" other vegetables like carrots, cucumbers, jicama, and even actual radishes this way! I like to eat the vegetables right away, but you can store the vegetables in this liquid for a decent amount of time. Just remember that the flavors will become more intense as the vegetables marinate, and there will be some texture changes, especially with the cucumber, as I'm sure you are all aware from buying pickles at the store.

Bon Appetit!

Thursday, October 14, 2010

Braised Greens

We got another box of veggies today, this one filled to the brim with some big leafy greens: kale, chard and turnips with the tops on. Last time, I tried to keep some similar items in my fridge for a while, but is just took up so much space, so this time, I decided to cook them right away.


Here is the end result of all those beautiful greens, along with the turnips that were leftover. I'll probably end up pickling them and I'll put a recipe for that as well. Now, I am not from "the South" so this is not going to be an authentic recipe. Also, I am allergic to pork and I didn't have all day to pull this off, as most traditional recipes call for. I was hungry, and it was time for lunch!

Ingredients*

1 onion
2 cloves garlic
1 bunch kale
1 bunch chard
tops from 1 bunch turnips
2 tbsp olive oil
1 tbsp balsamic vinegar
1 bay leaf
1 tsp smoked paprika
1 tsp each salt & pepper, plus more to taste

Slice the onion and mince the garlic.

Add the oil to a medium to large pot and put on high heat. Once the oil is hot, add the garlic. Stir continuously until the garlic begins to change color to a golden hue, then add the onions, bay leaf, smoked paprika and 1 tsp each salt and pepper. Combine ingredients well and then turn heat down to medium. Stir occasionally.

Make sure greens are free of dirt and grit. This can involve a lot of washing, but luckily the greens I got from Full Belly Farms were very clean. If you are using kale, you want to remove most of the stems, as these can be tough. I figured out today that if you hold the end of the stem with one hand, and then run the knife along it away from you, this is the easiest way to get it done. Don't worry about getting rid of all of the stem, just most of it it from the bottom and middle. Hold all of the leaves together, or as much as you can comfortably manage, and cut them into strips.

When the onions have become translucent and have browned a little, add the balsamic vinegar and the greens. You will have to do this a little at a time as they take up a lot of room and you will have to cook them down before you can add some more. Kale and turnip greens need a bit of cooking, at least 20 minutes or so, but chard only really needs to be wilted. If you want a more "authentic" consistency, you can certainly put a lid on this, turn the heat down and simmer the daylights out of it, but I think it's pretty darn tasty this way.

Since I was using 3 different kinds of greens that would cook at three different rates, I added them to the pot as I went. You can simplify this by sticking with 1 kind of green, but I like having the variety.

* (I know "bunch" is not a precise term, but since this is not baking, this is more about taste than precision. The bunches of kale and chard seemed to be about twice the size you would normally find in the supermarket. I used the tops of 3 large turnips, but these were huge, altogether about half the amount of greens as from one of the bunches of kale or chard. I used smoked paprika to give it that hint of smokiness, since I can't use bacon or ham because of my pork allergy. If you want to use smoked meats instead of smoked paprika, by all means, do so. Simply dice the meat and add them to the hot pan to cook before you add the garlic. If you are using bacon, omit the olive oil.)


I ended up with this huge pot of tasty goodness that I'll be able to enjoy for the next few days.


Paired with a piece of roasted chicken, a steamed ear of corn (from my last Full Belly veggie box!), and a cool mug of iced tea to beat the heat, and I had delicious and nutritious lunch! Bon Appetit!

Tuesday, October 12, 2010

Turnips! two weeks in a row!

Take the TURNIPS and chop them up small. Cover them with 3 TBSP balsamic vinegar, 1 TBSP honey, 1 TBSP olive oil, and bake... up to 45 minutes depending on how small you chop them. Serve up with goat cheese and other salad ingredients.

Take off the green leafy tops, wash them, and treat them like arugula (a little spicy). Great on sandwiches or salads.

STAY TUNED

for delicious veggie-idea sharing!